Facebook Visual Flow Builder Encyclopedia (opened panels)

Facebook Visual Flow Builder Encyclopedia (opened panels)

Messenger/Facebook Visual Flow Builder builds a full conversation as wired nodes. This guide explains each OPENED config panel (not collapsed-canvas junk). Path: Facebook Tools → Bot Manager → Bot Reply → Create New Flow → double-click an element to open its config.

Related: Keyword reply via Flow Builder · Get Started · No Match · Bot Manager map.

Before you start

  • Enable Enable Bot Connection for the correct Page/account.
  • Test on a lab account (Test Page) before production.
  • Double-click a node to open its panel — do not rely on collapsed crops.

1) bot manager

  1. Bot Manager — Bot Reply card is the Visual Flow Builder entry
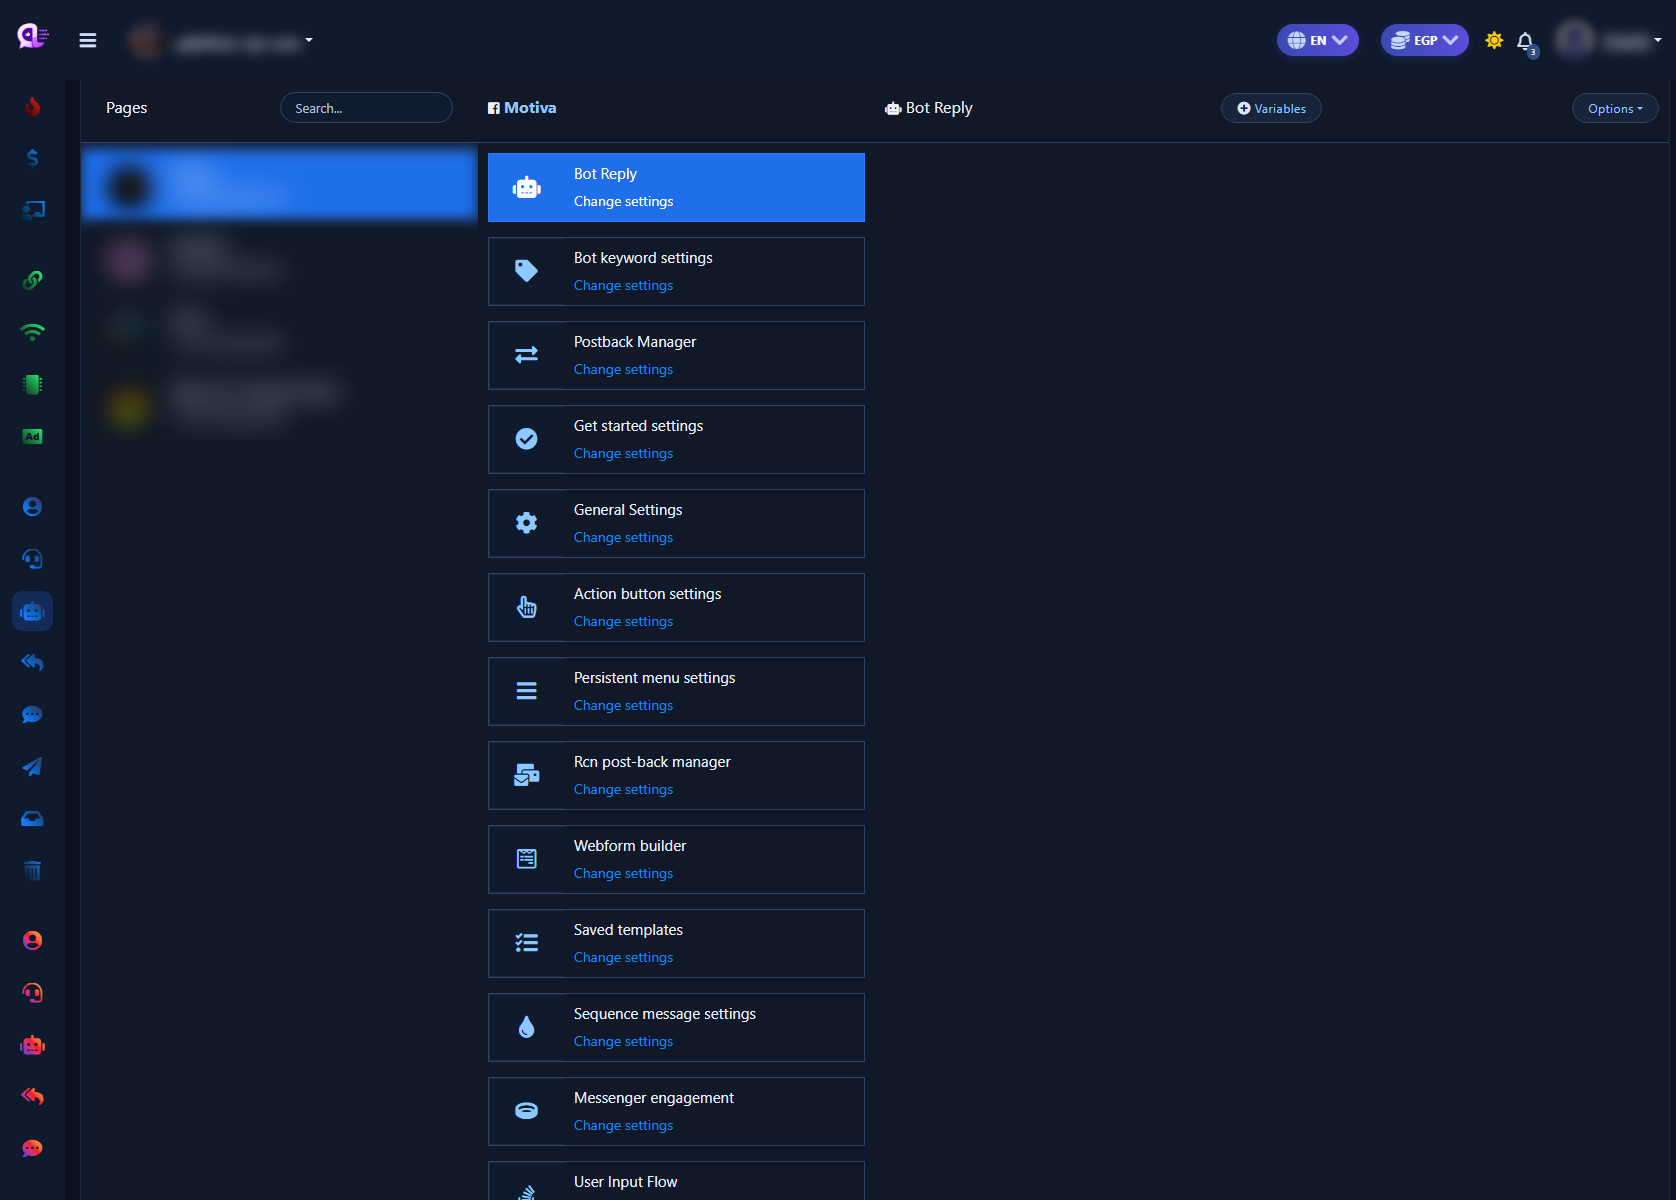
  2. Facebook Bot Manager hub with Bot Reply and settings cards
    Bot Manager — Bot Reply card is the Visual Flow Builder entry

2) flow list

  1. Open the flow list and review reference-name rows plus Create new flow.
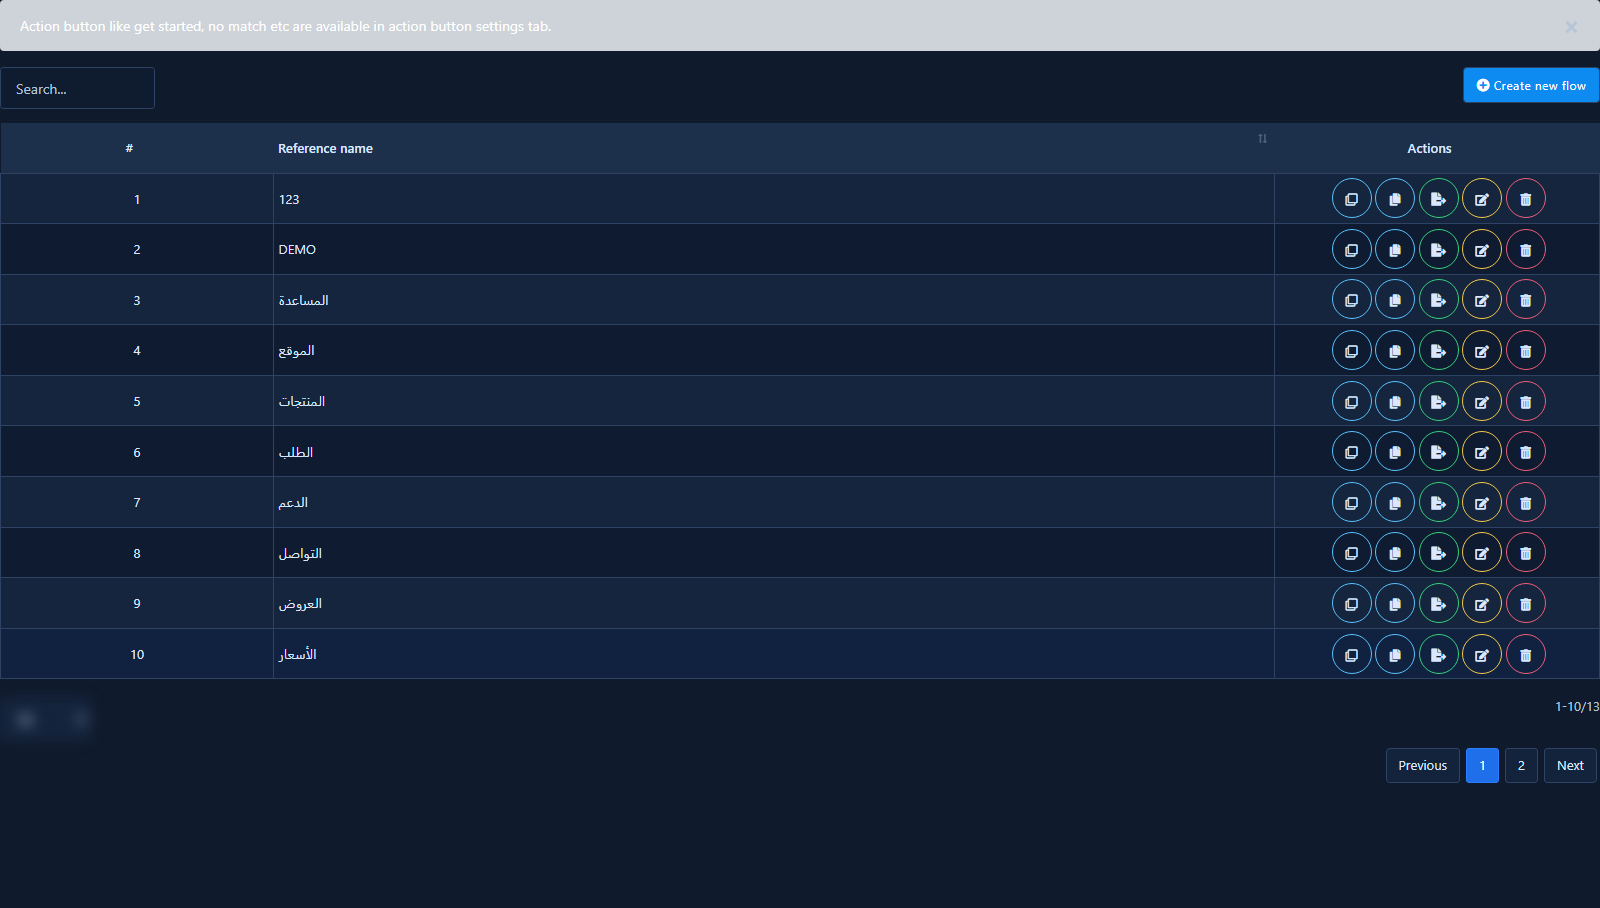
  2. Visual Flow list with Reference Name rows and Create new flow
    Flow list — reference names and Create new flow

3) start node

  1. New flow — Start Bot Flow node (not Get Started template)
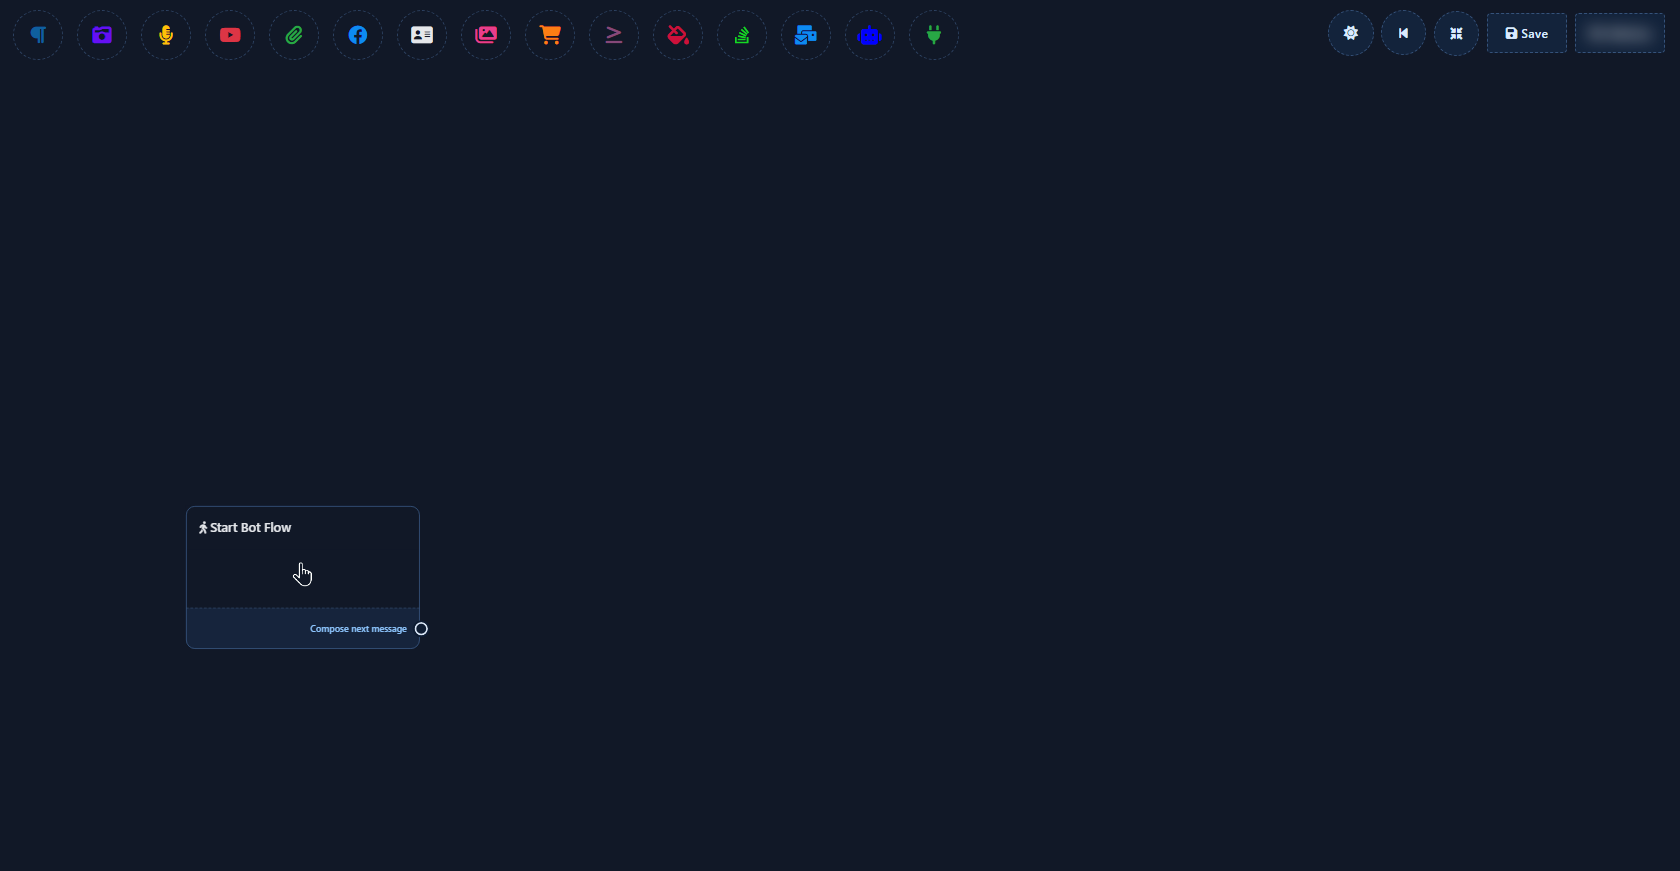
  2. New flow editor with Start Bot Flow node and element dock
    New flow — Start Bot Flow node (not Get Started template)

4) configure reference

  1. Configure Reference panel open — keyword field and match type (Exact keyword / String match).
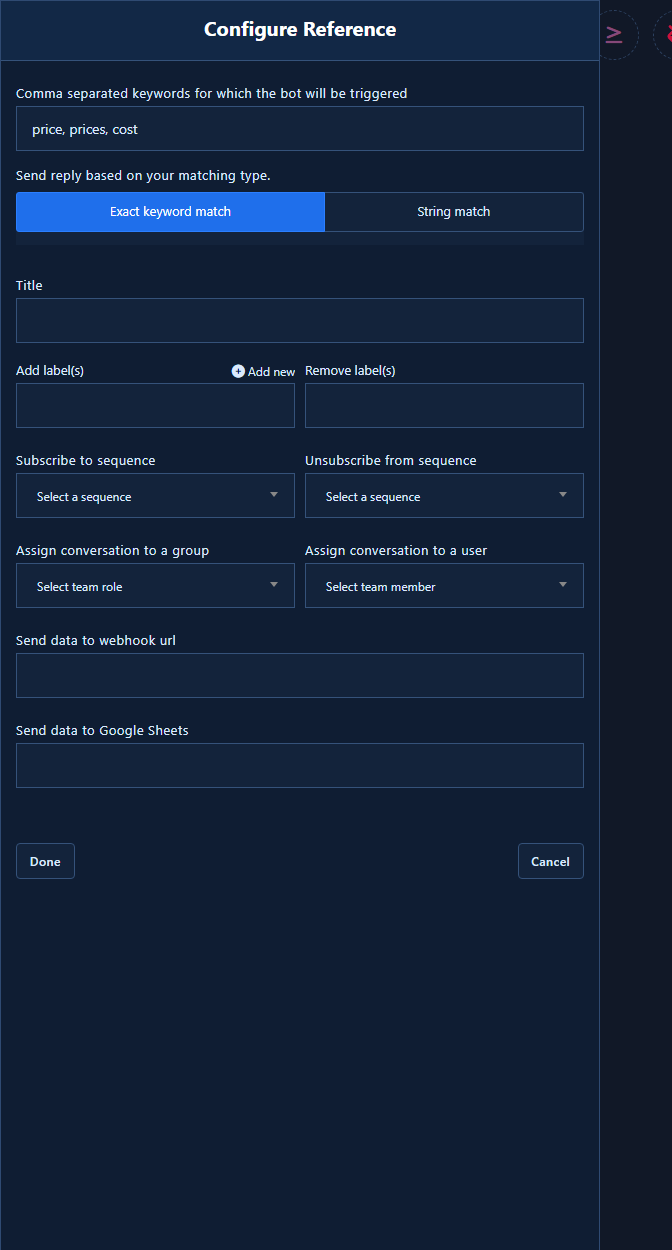
  2. Configure Reference: trigger keywords and match type
    Configure Reference panel open — keyword field and match type (Exact keyword / String match).

5) dock palette

  1. Element dock — hover an icon for its name (Text, Image, Audio…)

  2. Facebook Visual Flow element dock with Text tooltip
    Element dock — hover an icon for its name (Text, Image, Audio…)

6) text open

  1. Text node open — write the reply and insert name/custom variable tags
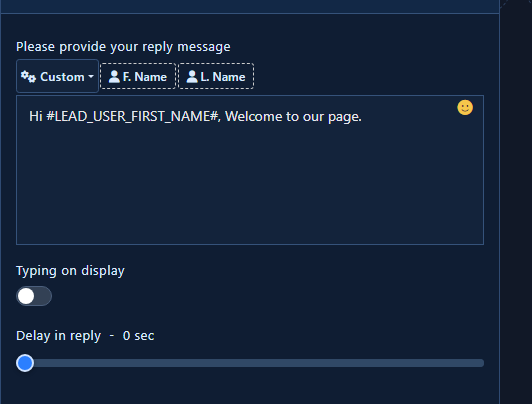
  2. Configure Text Message panel open with reply textarea and variable tags
    Text node open — write the reply and insert name/custom variable tags

7) typing delay open

  1. Open controls: «Typing on display» toggle and «Delay in reply» slider inside the Text message config (or message panel).
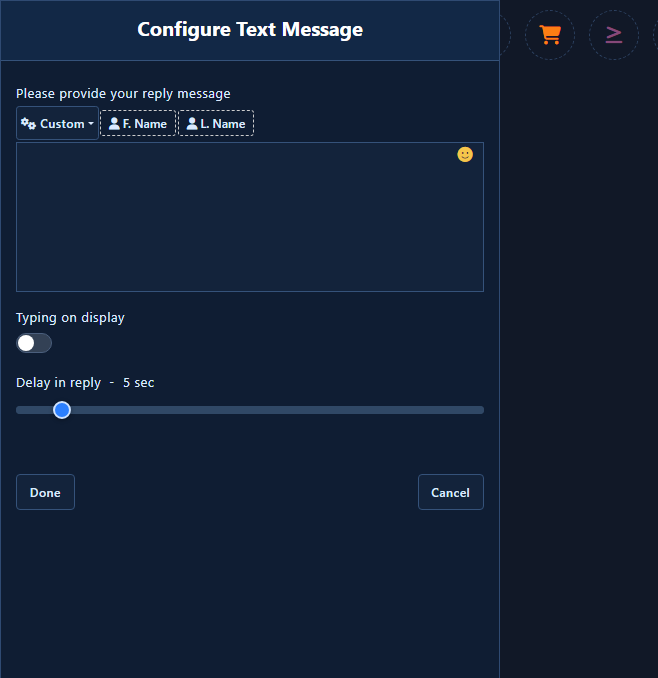
  2. Typing on display and Delay in reply — fields visible
    Open controls: «Typing on display» toggle and «Delay in reply» slider inside the Text message config (or message panel).

8) buttons open

  1. Configure Button open: button name + “When user press the button” type list — Send Message / Start a flow (postback), Redirect to website URL, Webview, Call us, etc. Pick a type, then fill the matching field (template or URL).
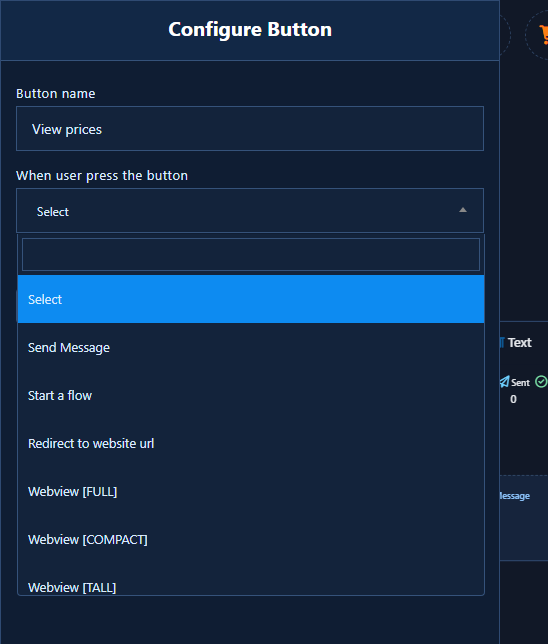
  2. Visual Flow — Configure Button open with Postback and URL types
    Configure Button open: button name + “When user press the button” type list — Send Message / Start a flow (postback), Redirect to website URL, Webview, Call us, etc. Pick a type, then fill the matching field (template or URL).

9) quick replies open

  1. Configure Quick Reply panel open on a Quick Reply node: Quick reply type (Send message / Phone / Email…), Button name, plus optional labels, sequence, and assignment fields. Create the node by dragging the Quick Replies output from a Text message.
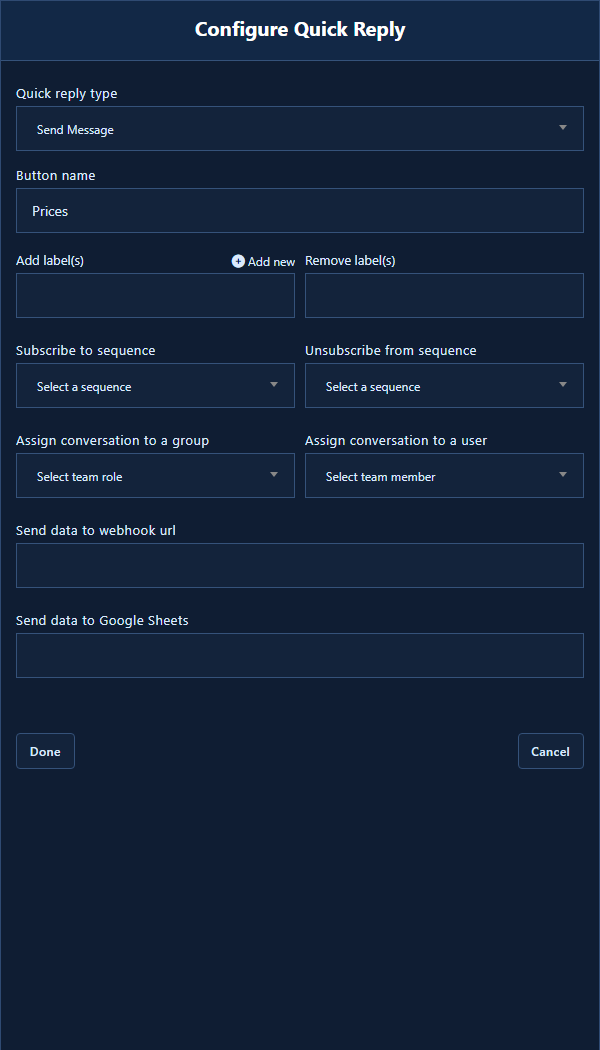
  2. Configure Quick Reply panel open on a Quick Reply node: Quick reply type (Send message / Phone / Email…), Button name, plus optional labels, sequence, and assignment fields. Create the node by dragging the Quick Replies output from a Text message.
    Configure Quick Reply panel open on a Quick Reply node: Quick reply type (Send message / Phone / Email…), Button name, plus optional labels, sequence, and assignment fields. Create the node by dragging the Quick Replies output from a Text message.

10) ai open

  1. Configure AI Reply Message — flow-specific instructions, typing on display, and reply delay (panel open).
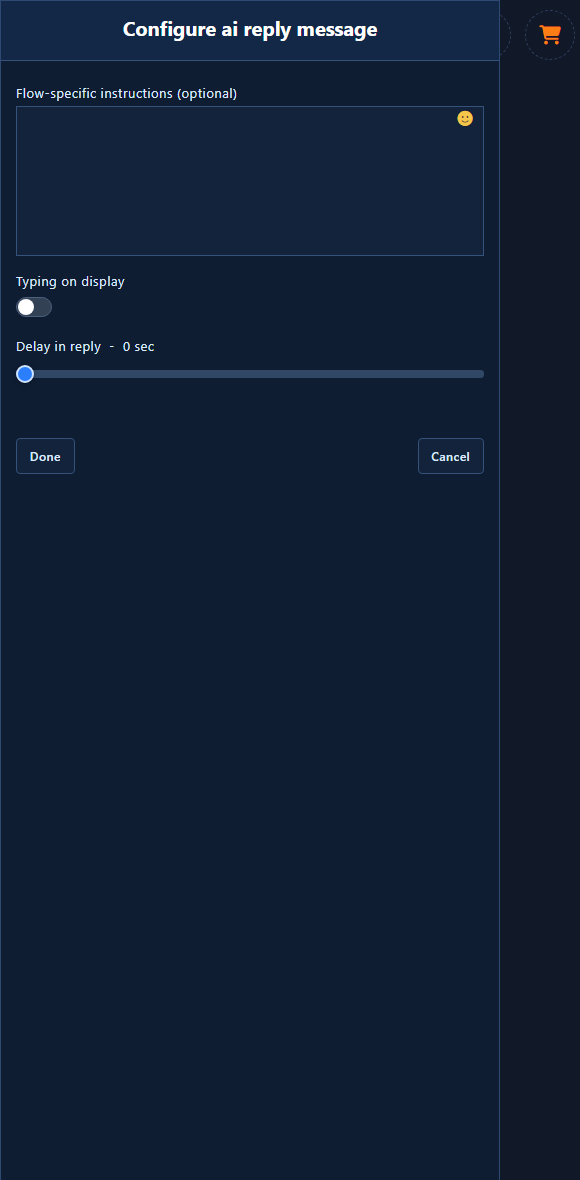
  2. Configure AI Reply Message — flow-specific instructions, typing on display, and reply delay (panel open).
    Configure AI Reply Message — flow-specific instructions, typing on display, and reply delay (panel open).

11) Configure Image

  1. Facebook Test Page Visual Flow Image node with Configure Image fully open: «Please provide your reply image», URL paste field, dashed upload box with cloud icon, Supported types png/jpg/gif, Typing on display toggle, Delay in reply slider, Done/Cancel. Shows upload/URL fields — not a collapsed canvas stats card.
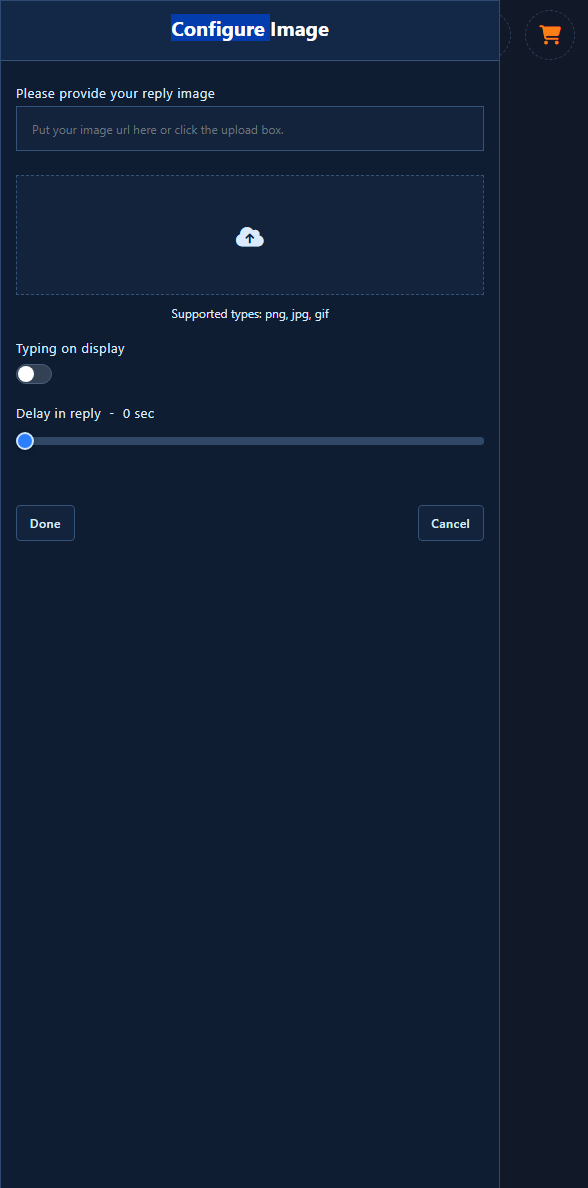
  2. Image node open — upload or URL (PNG/JPG/GIF)
    Image node open — upload or URL (PNG/JPG/GIF)

12) video open

  1. Video — upload or URL (MP4 / FLV / WMV)
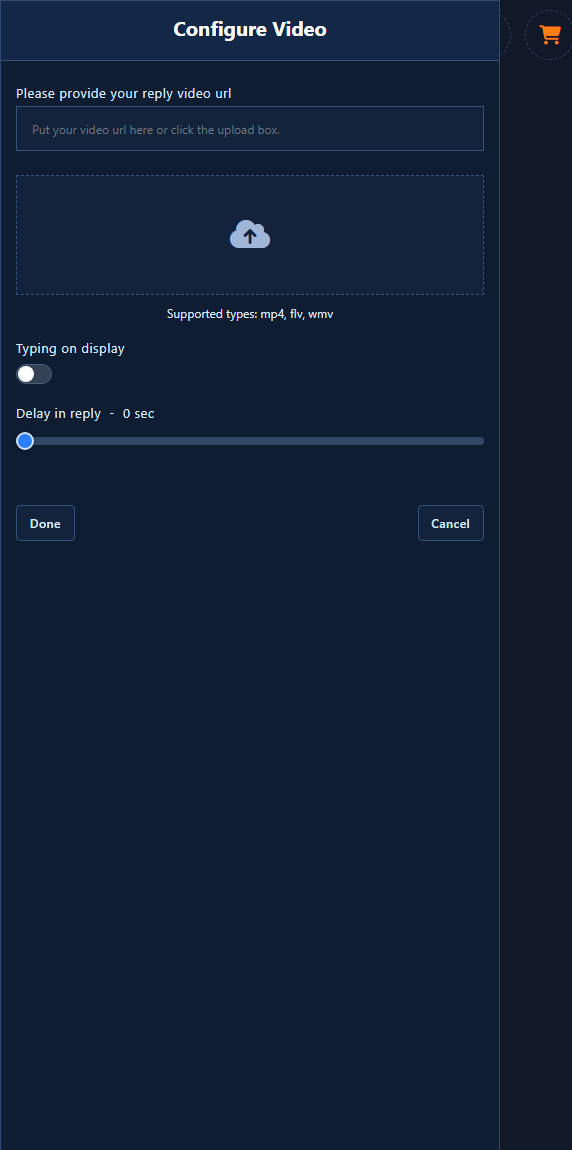
  2. Configure Video panel open with URL/upload and supported types
    Video — upload or URL (MP4 / FLV / WMV)

13) audio open

  1. Configure Audio open — audio URL or upload (AMR/MP3/WAV), typing on display, and reply delay.
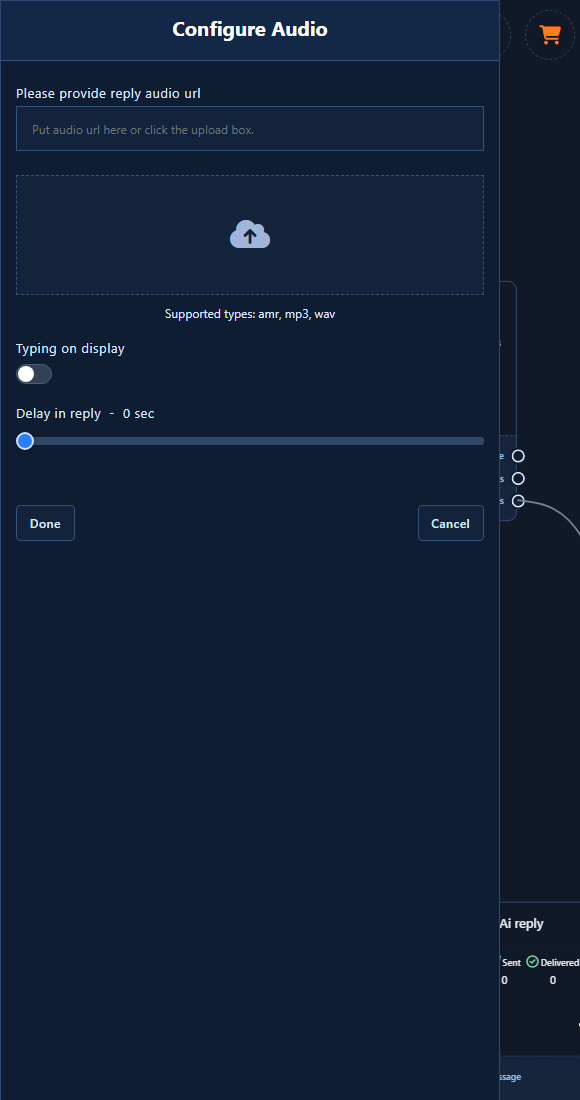
  2. Audio node configuration panel in Facebook Visual Flow Builder
    Configure Audio open — audio URL or upload (AMR/MP3/WAV), typing on display, and reply delay.

14) file open

  1. Open Configure File and review upload/URL fields and supported types.
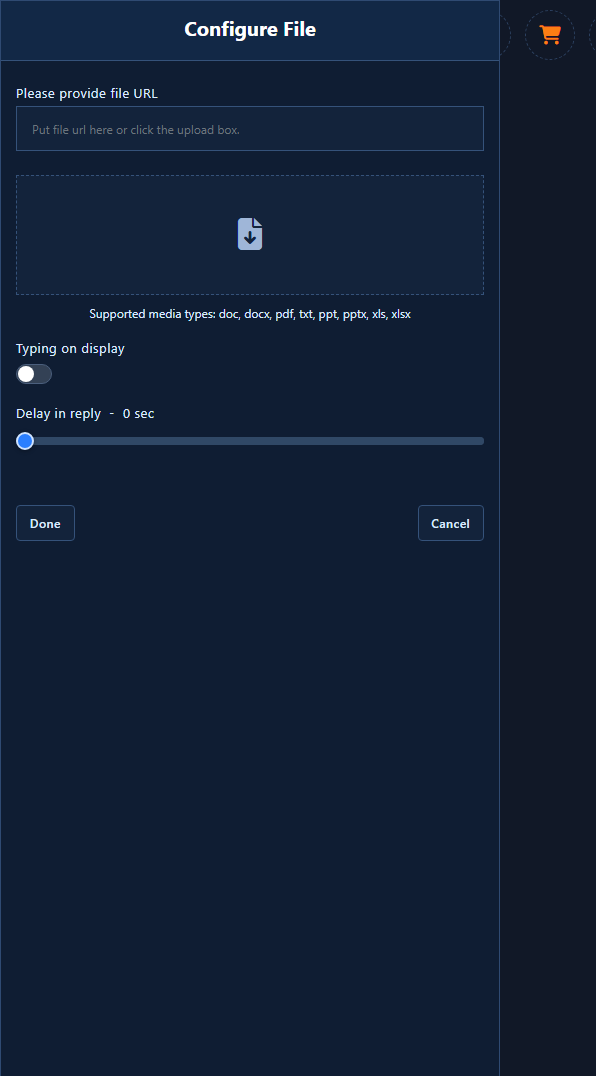
  2. Configure File panel open with URL/upload and supported document types
    Configure File open — upload/URL and supported document types

15) fb media open

  1. Open Facebook Media config: «Facebook Media URL» field, «Typing on display» toggle, and «Delay in reply» — Messenger/Facebook-only element.
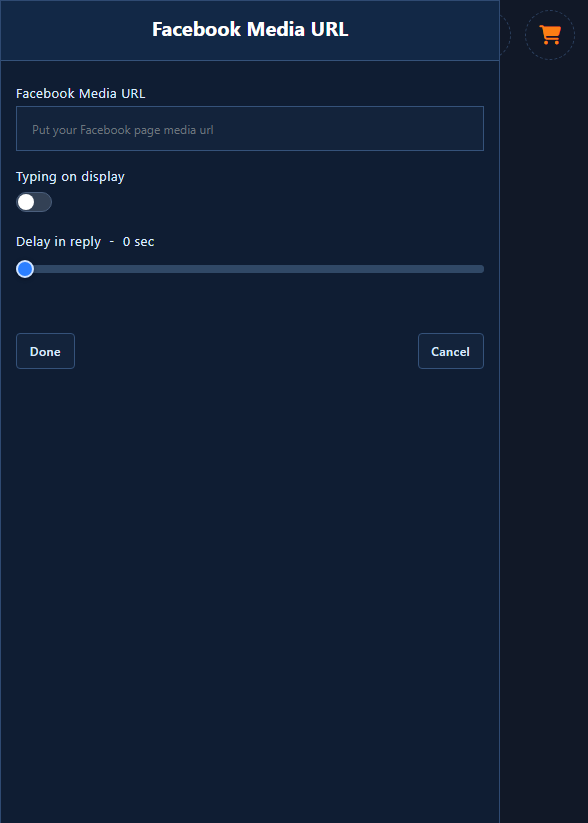
  2. Open Facebook Media config: «Facebook Media URL» field, «Typing on display» toggle, and «Delay in reply» — Messenger/Facebook-only element.
    Open Facebook Media config: «Facebook Media URL» field, «Typing on display» toggle, and «Delay in reply» — Messenger/Facebook-only element.

16) Configure Generic Template (Card)

  1. Facebook Test Page Visual Flow Card (Generic Template) with Configure Generic Template fully open: reply image upload/URL, image click destination, Title and Subtitle fields, plus the Card node's Buttons output for card CTAs — not a collapsed canvas stats card.
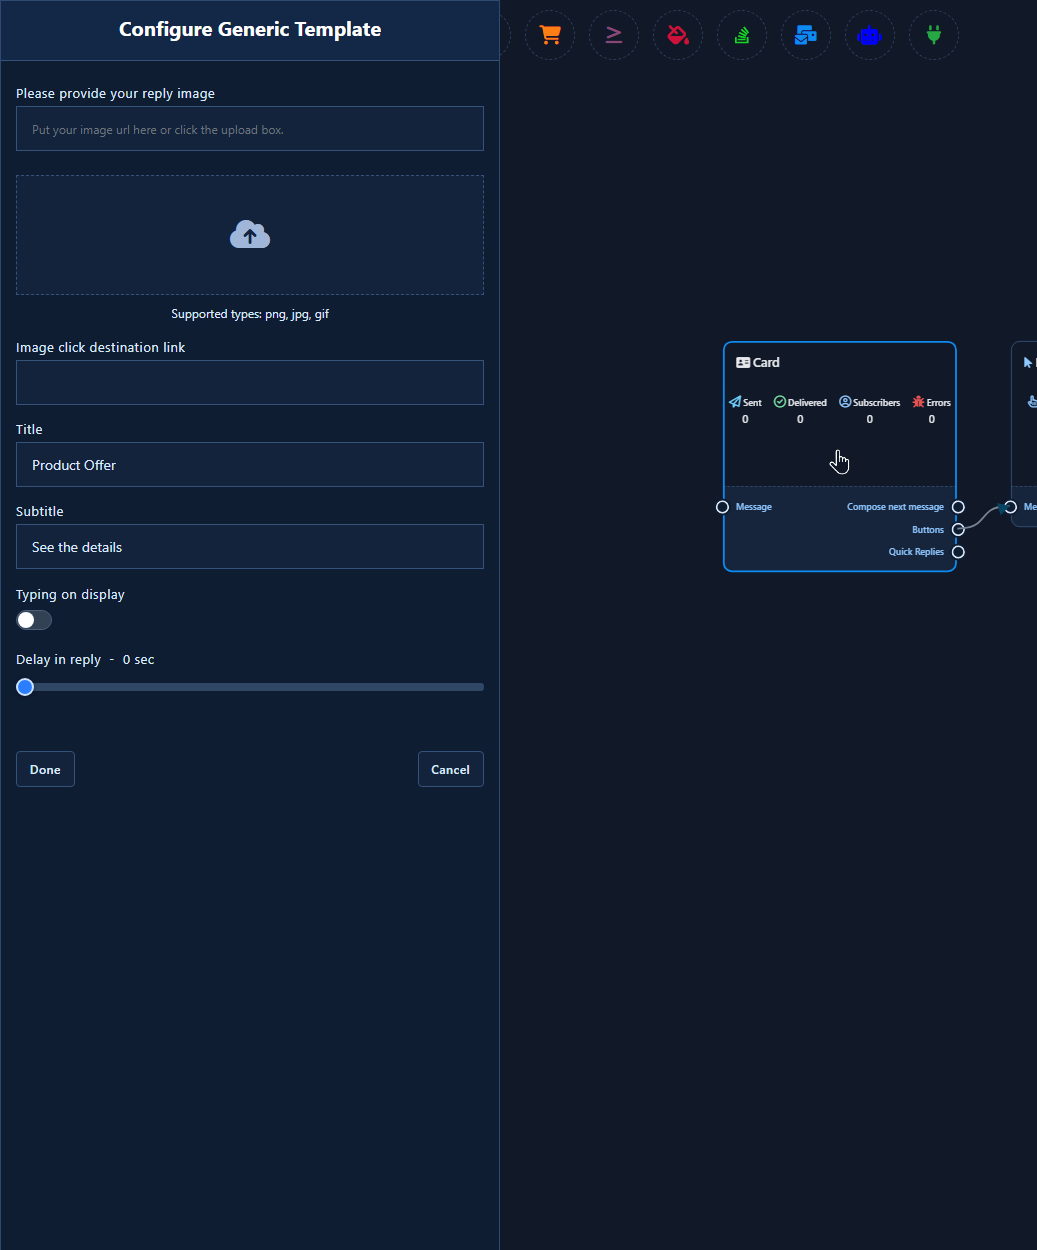
  2. Card open — image, title, subtitle, and Buttons output.
    Card open — image, title, subtitle, and Buttons output.

17) carousel open

  1. Configure Carousel Item open: reply image (upload or URL — PNG/JPG/GIF), image-click destination link, Title, and Subtitle. Each Carousel item hangs off the parent Carousel Items output and can wire Buttons from the item.
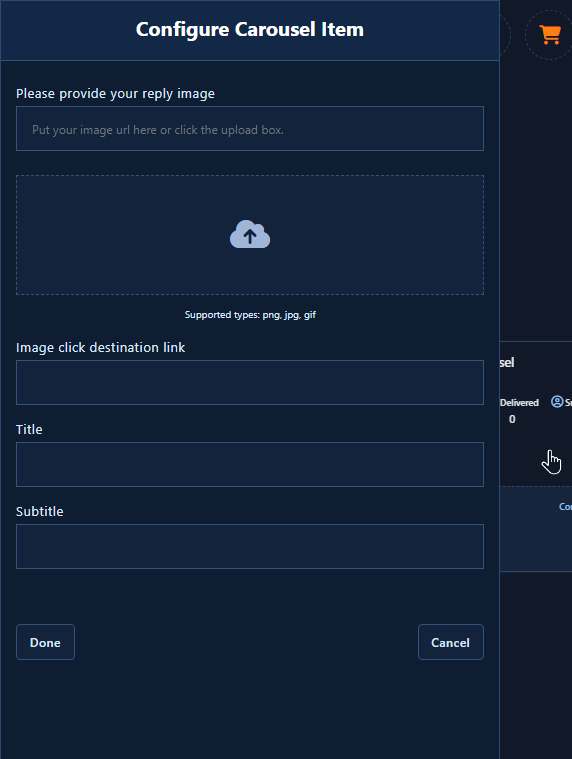
  2. Configure Carousel Item with image, title, and subtitle fields
    Configure Carousel Item open: reply image (upload or URL — PNG/JPG/GIF), image-click destination link, Title, and Subtitle. Each Carousel item hangs off the parent Carousel Items output and can wire Buttons from the item.

18) condition open

  1. Configure Condition open beside the Conditional Reply node: All Match / Any Match toggles, System Field rows (variable + operator + gender) and Custom Field rows (variable + operator + value). On the node, two branch outputs: True = condition matched, False = did not match — wire each socket to a different next reply.
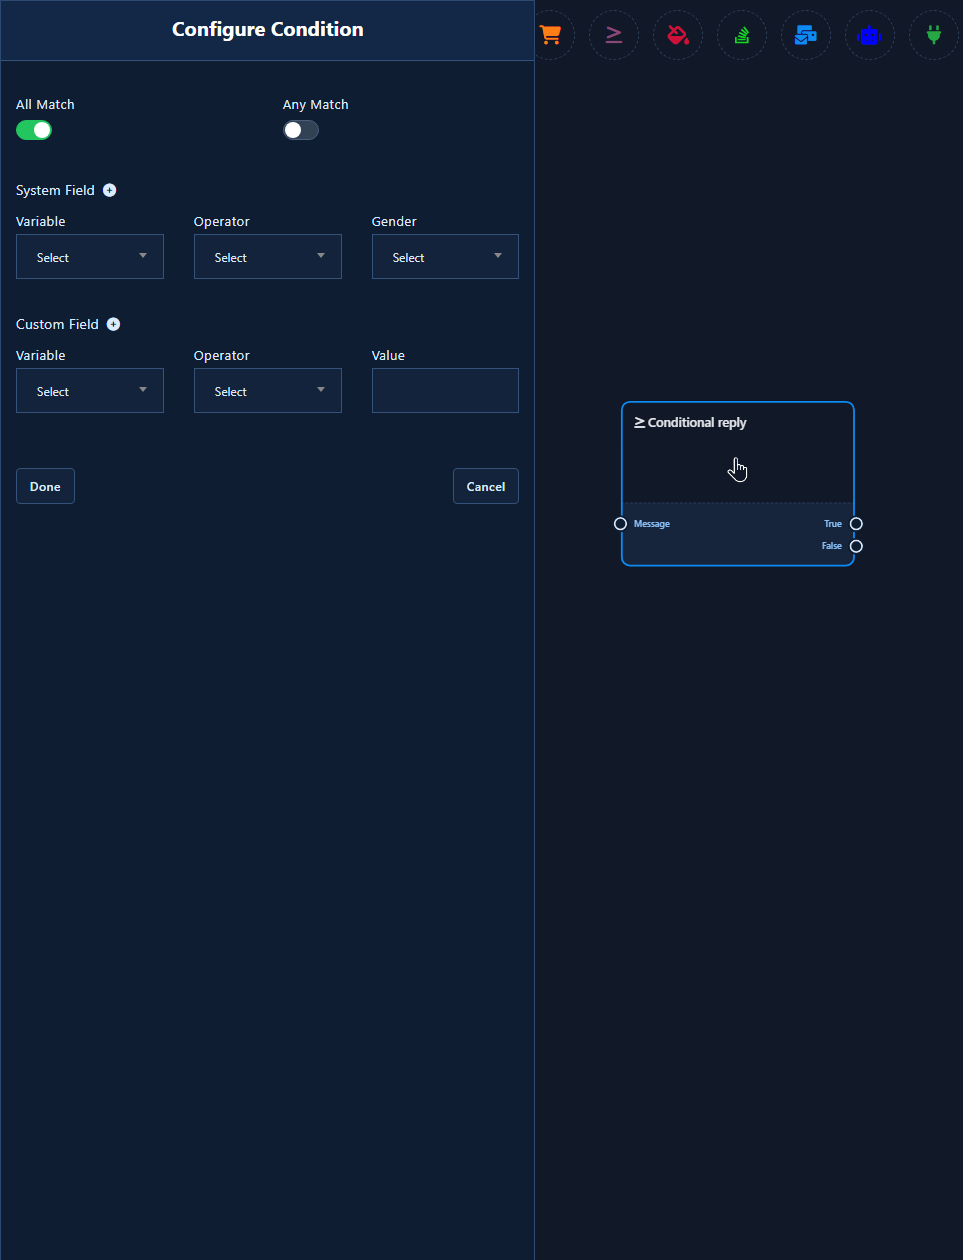
  2. Configure Condition panel open with system/custom fields and Conditional Reply node True/False outputs
    Configure Condition open beside the Conditional Reply node: All Match / Any Match toggles, System Field rows (variable + operator + gender) and Custom Field rows (variable + operator + value). On the node, two branch outputs: True = condition matched, False = did not match — wire each socket to a different next reply.

19) ecommerce open

  1. Configure Ecommerce panel open: Select your ecommerce store, Select products for carousel/generic reply, Buy now button text, plus Typing on display and Delay in reply.
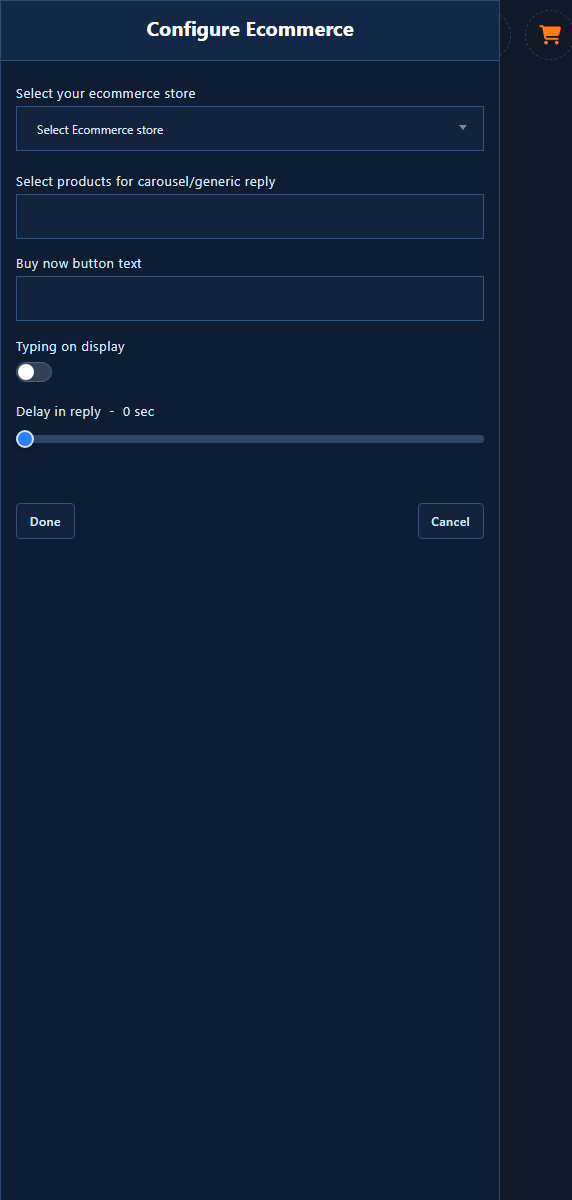
  2. Configure Ecommerce — store, products, and Buy now button
    Configure Ecommerce panel open: Select your ecommerce store, Select products for carousel/generic reply, Buy now button text, plus Typing on display and Delay in reply.

20) http api open

  1. HTTP API create/edit form open (from Create on the flow node): API Name, Method (e.g. POST), End-point URL, and Header Data — verify/save before selecting the template in the editor.
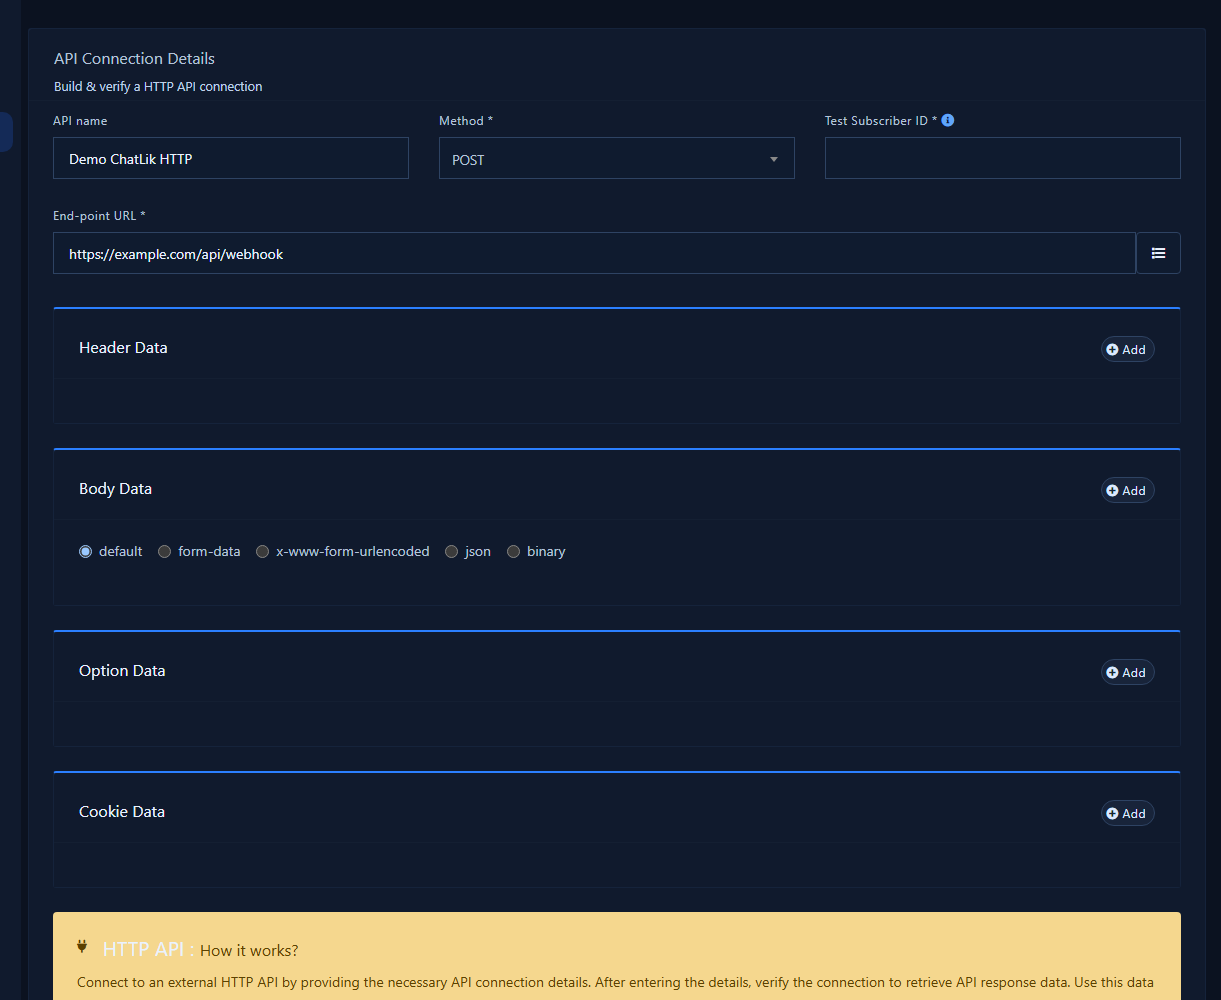
  2. HTTP API connection details — Method, endpoint URL, and fields
    HTTP API create/edit form open (from Create on the flow node): API Name, Method (e.g. POST), End-point URL, and Header Data — verify/save before selecting the template in the editor.

21) user input open

  1. Configure User Input Flow open — pick the flow campaign, then send answers to a Webhook URL or Google Sheets.
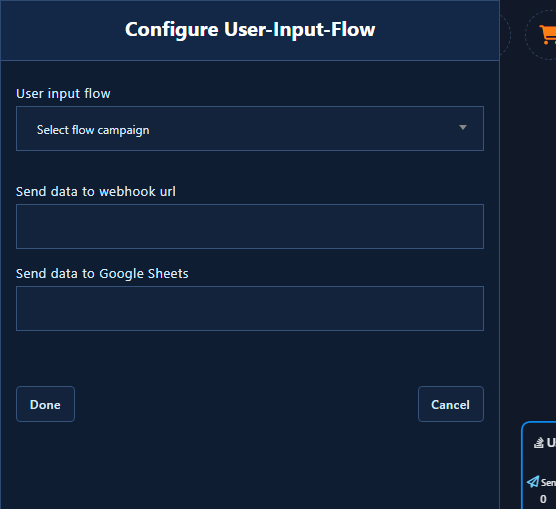
  2. User Input Flow config: campaign, Webhook, Google Sheets
    Configure User Input Flow open — pick the flow campaign, then send answers to a Webhook URL or Google Sheets.

22) recurring open

  1. Recurring Notification (RCN) config open: request Title, RCN postback ID, attached image (URL or upload PNG/JPG/GIF), Typing-on-display toggle, and Delay-in-reply slider — then Done/Cancel.
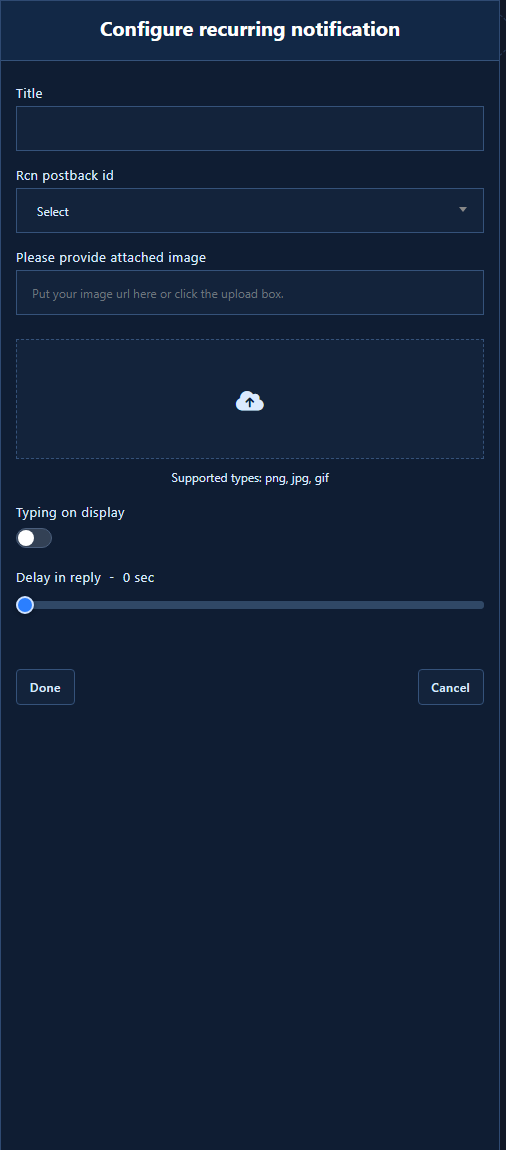
  2. Configure recurring notification — title, RCN postback, image, delay fields
    Recurring Notification (RCN) config open: request Title, RCN postback ID, attached image (URL or upload PNG/JPG/GIF), Typing-on-display toggle, and Delay-in-reply slider — then Done/Cancel.

23) sequence open

  1. Configure New Sequence open (sequence campaign): Sequence Name, Starting Time, Closing Time, Time Zone, and Message Tag. After save, Promotional / Non-promotional outputs appear; the follow-up step exposes «Send message after» (mins/hours/days) for drip timing.
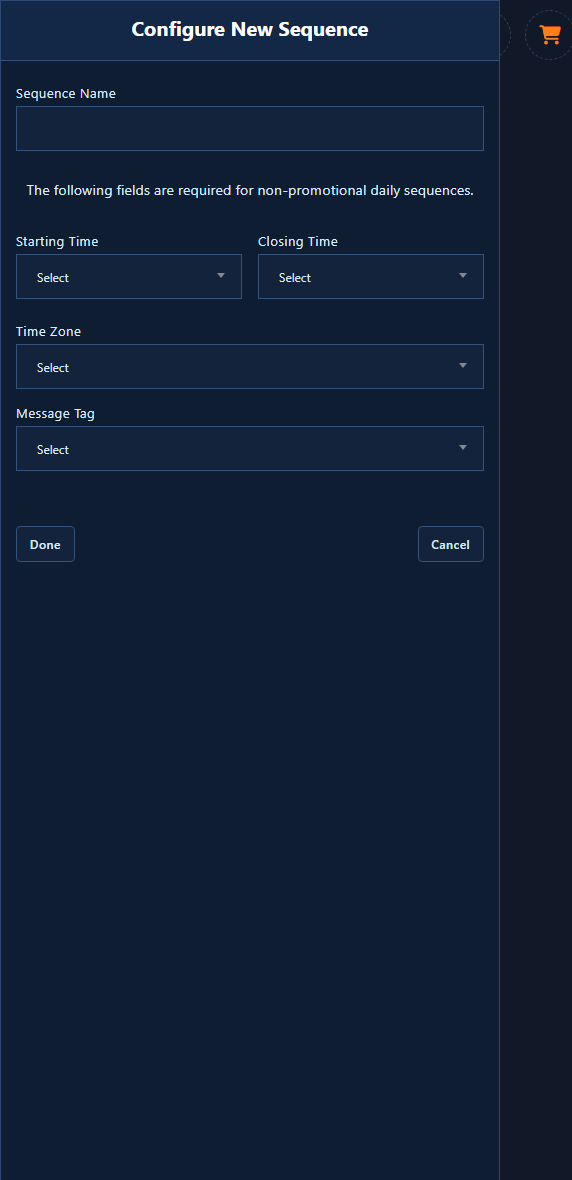
  2. Configure New Sequence — schedule fields: name, starting/closing time, timezone, message tag
    Configure New Sequence open (sequence campaign): Sequence Name, Starting Time, Closing Time, Time Zone, and Message Tag. After save, Promotional / Non-promotional outputs appear; the follow-up step exposes «Send message after» (mins/hours/days) for drip timing.

24) save toolbar

  1. Top Save toolbar — Save (Ctrl+S) with undo/rearrange and page controls
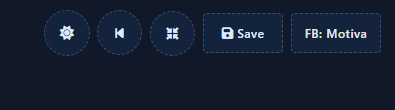
  2. Top toolbar: undo, rearrange, and Save with FB page badge
    Top Save toolbar — Save (Ctrl+S) with undo/rearrange and page controls

25) Multi keywords + match type

  1. Enter comma-separated keywords, then choose Exact match for full-token triggers, or String match when a substring in the user message is enough.
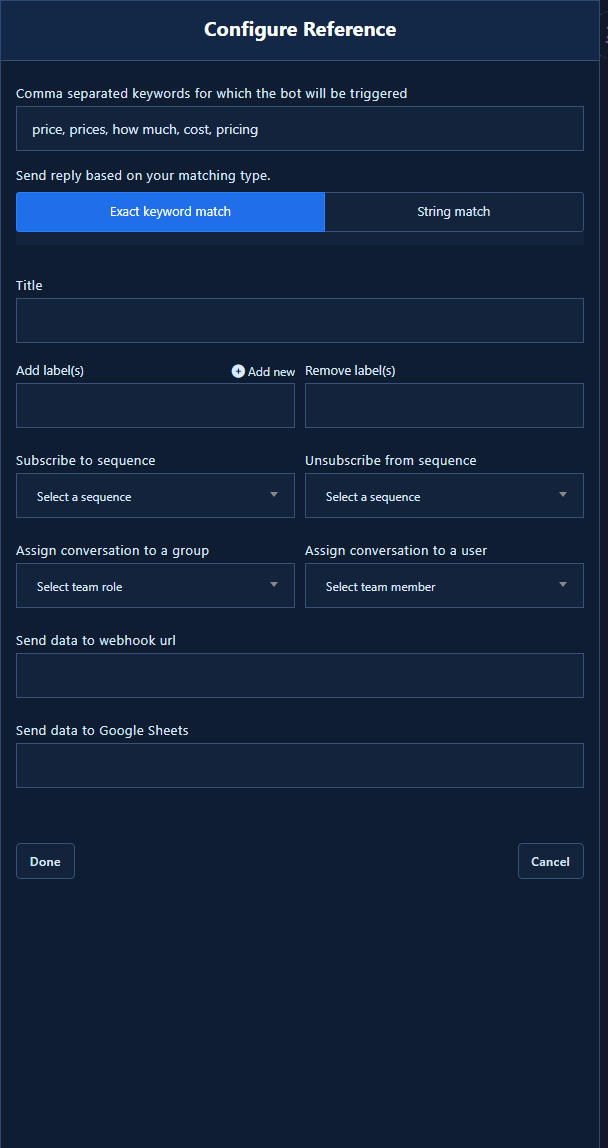
  2. Configure Reference open with real multi keywords (price, prices, how much…) and both match types visible: Exact keyword
    Configure Reference open with real multi keywords (price, prices, how much…) and both match types visible: Exact keyword match vs String match.

26) Wired mini-flow: Start → price Text → Buttons

  1. Wire Compose next → Text, fill the offer, then pull the Buttons output.
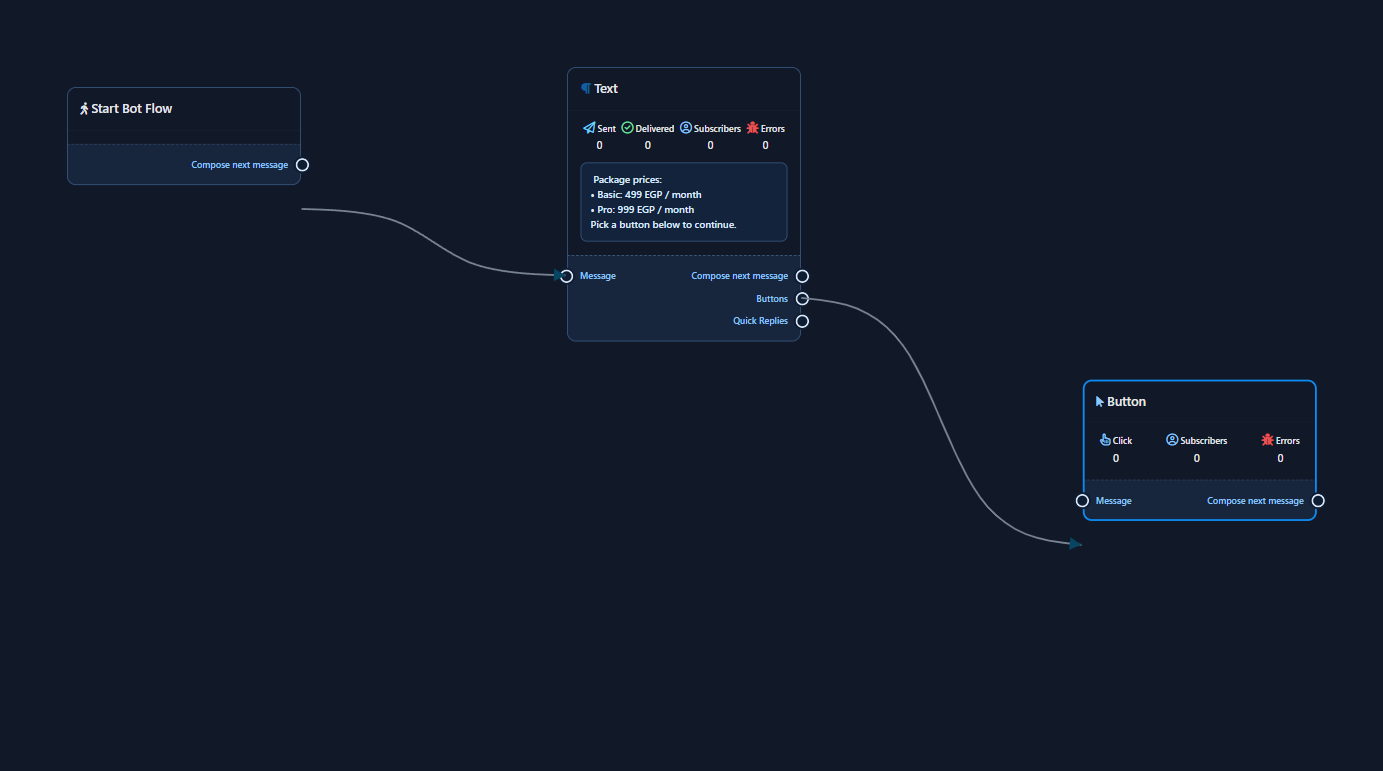
  2. Full canvas with a real wired path: Start Bot Flow → Text with a clear Arabic/English price offer → Buttons branch. Read
    Wired canvas: Start Bot Flow → Text node with real package prices (499/999 EGP) and a visible «View prices» button on the node.

27) Button types — dropdown open

  1. Pick the type from the open list before filling the matching field (flow/template or URL).
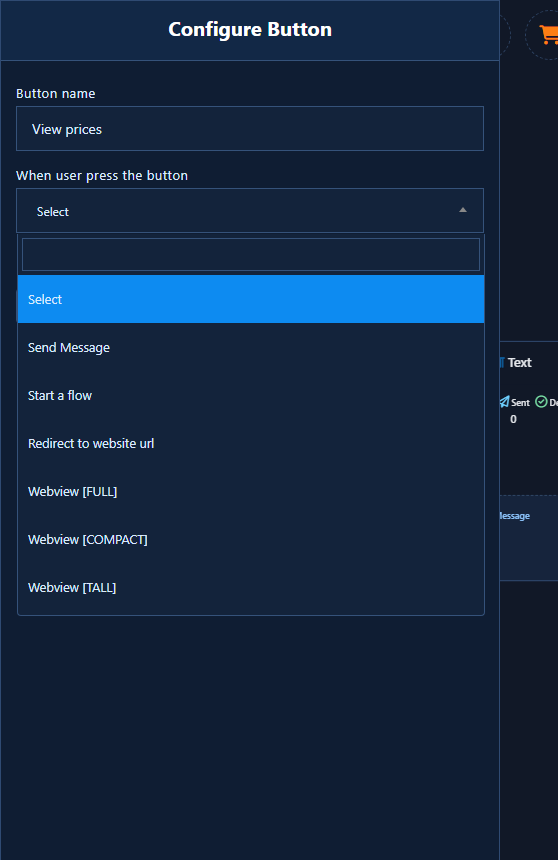
  2. Configure Button open with the action-type dropdown expanded: Send Message / Start a flow (postback) vs Redirect to webs
    Configure Button open with the action-type dropdown expanded: Send Message / Start a flow (postback) vs Redirect to website URL, Webview, and related options.

28) Button postback configured

  1. Choose Start a flow, then pick the destination flow — an in-bot postback, not an external URL.
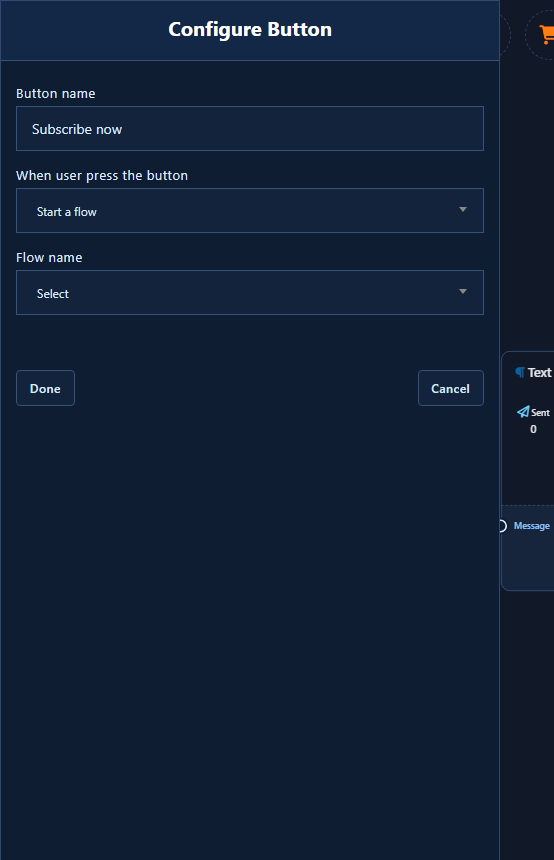
  2. Configure Button after choosing postback: real button label + Send Message / Start a flow, with the linked template/flow
    Configure Button after choosing postback type «Start a flow»: real button name (Subscribe now) + Flow name field visible to link another flow.

29) Quick reply with real labels

  1. Quick replies are chips under the message; fill name + type before Save.
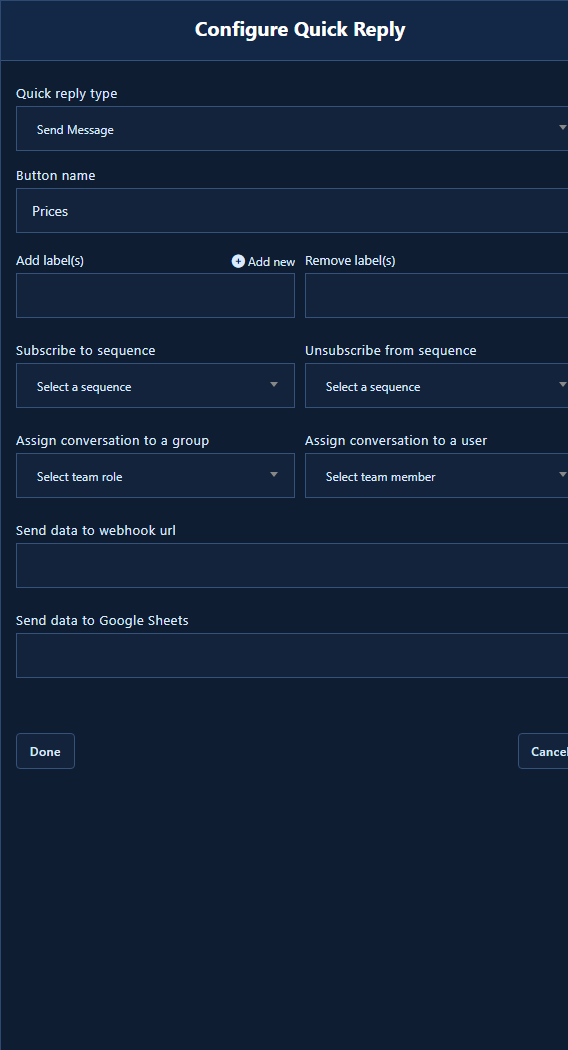
  2. Configure Quick Reply open with real button labels (e.g. Prices / Contact / Subscribe) and reply type visible — ready to
    Configure Quick Reply open with real button labels (e.g. Prices / Contact / Subscribe) and reply type visible — ready to wire to the next message.

30) Condition True/False wired to two replies

  1. Wire True to the success path and False to the fallback — leave no dangling socket.
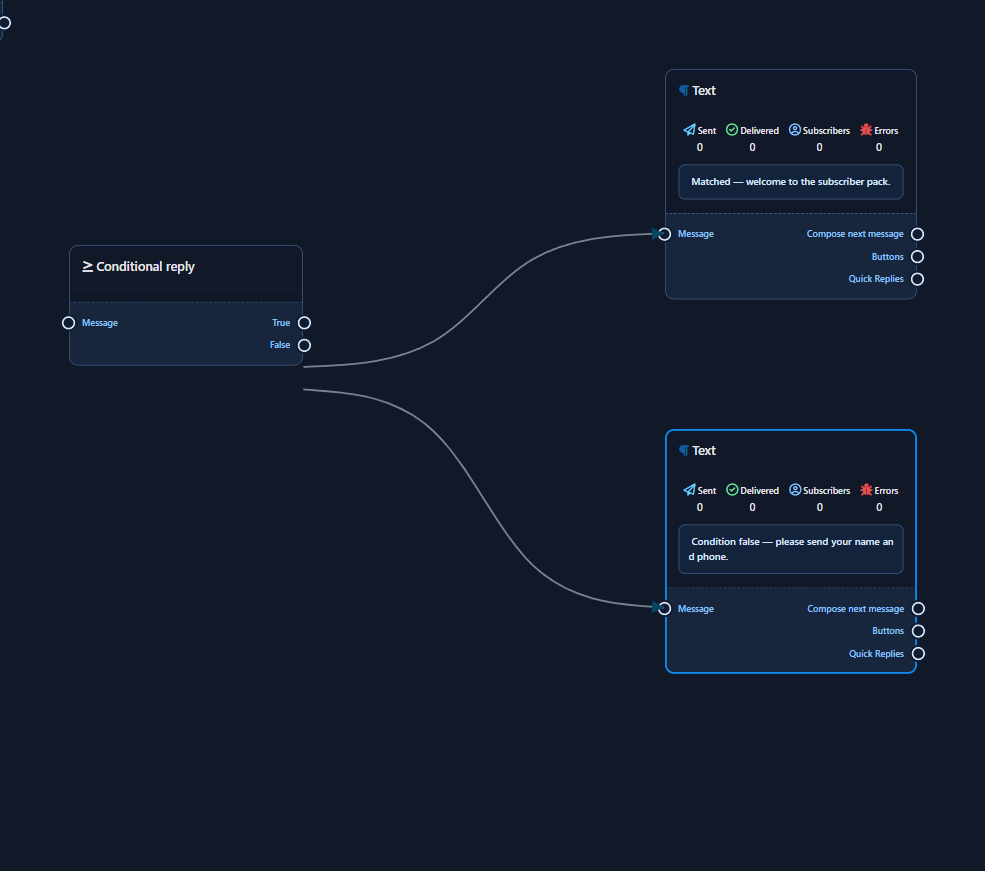
  2. Conditional Reply with True and False outputs, each wired to a different Text node with real copy (e.g. subscriber thank
    Conditional Reply with True/False outputs, each wired to a different Text node with real copy (subscriber welcome vs ask for name/phone).

31) Before wiring — sockets ready

  1. Connect by dragging from the output socket circle to the input socket.
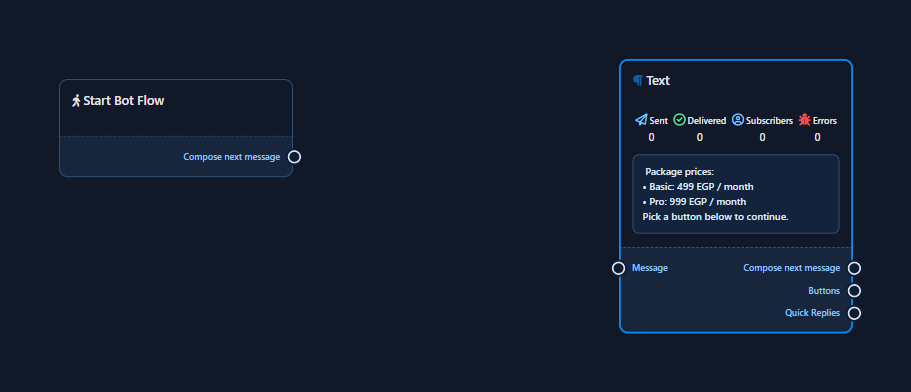
  2. Close-up before the wire: Compose-next output beside the Text node input — not connected yet.
    Close-up before the wire: Compose-next output beside the Text node input — not connected yet.

32) After wiring — connection visible

  1. If the wire is missing or broken, re-drag output→input then Save.
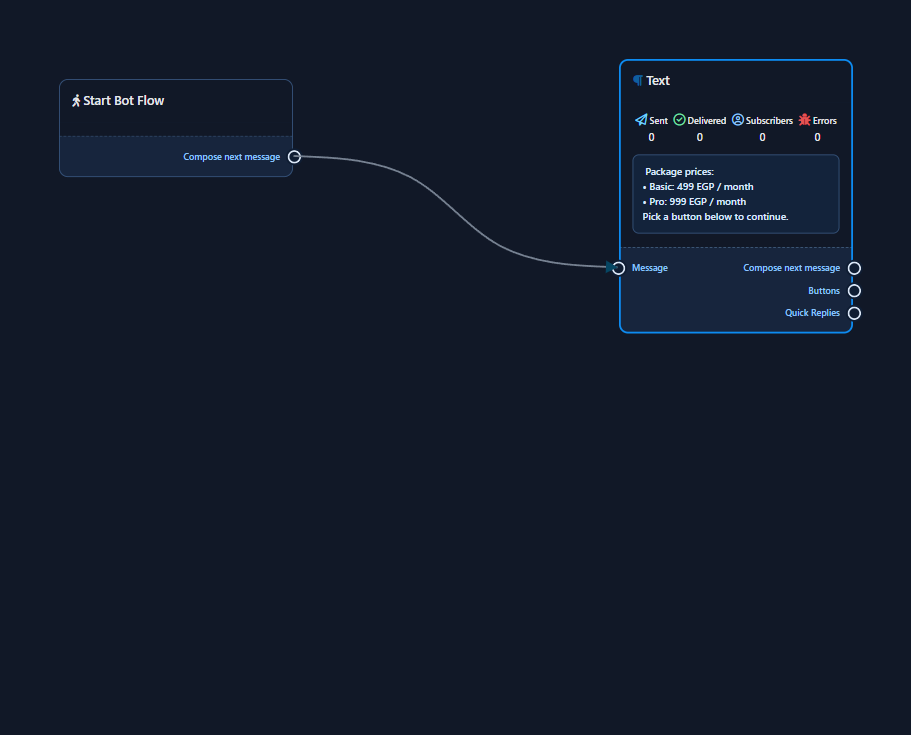
  2. Same framing after the drag: a clear wire from Start Bot Flow into the Text node.
    Same framing after the drag: a clear wire from Start Bot Flow into the Text node.

Common mistakes

  • Shooting a collapsed node instead of an open config.
  • Mixing Facebook and Instagram screens.
  • Forgetting Done then Save.

Next step

Try ChatLike via sign up or compare plans.

Keywords ChatLikeMessenger bot
Share this article: